
A Galette Is the Perfect Easy Dessert
A galette is a rustic, free-form French tart that can be either sweet or savory depending on the filling. Its flaky, buttery crust is incredibly easy to work with and comes together in just minutes whether you use a food processor or make it by hand (instructions for both methods are included in our recipe).
Just like pies, galettes can be filled with a variety of fruits. You could substitute apples for the pears in this recipe, use stone fruits (try our plum galette) or berries – there are loads of options.
What You’ll Need for This Recipe
A few simple ingredients are all you need to make this easy pear galette.
- For the pastry crust: Unsalted butter, all-purpose flour, granulated sugar, salt, ice water, and an egg (to make an egg wash).
- For the pear filling: Ripe (but still firm) pears, cinnamon, lemon juice (to keep the pears from turning brown), and a little sugar (how much will depend on the sweetness of your pears).
How to Make Our Pear Galette
This is an overview of how this dish is made. Detailed measurements, ingredients, instructions, and times are available in the printable version of the recipe below.
- Have a glass of ice water standing by and cut the butter into small pieces.
- To mix the dough in a food processor: Place the steel blade into the work bowl of your food processor and add the flour, sugar, and salt. Scatter the butter over the flour. Using the pulse function, process until the mixture is coarse and crumbly, with visible pieces the size of very small peas. Sprinkle the mixture with ice water and pulse until the dough comes together, adding more water in small increments as needed. Be careful not to over-process.
- To mix the dough by hand: Whisk the flour, sugar, and salt together in a large mixing bowl and add the butter pieces. Using your fingertips (or a pastry cutter), work the butter into the flour mixture until it’s coarse and crumbly with visible pieces the size of very small peas. Make a well in the center and add ice water. Mix with your fingertips, adding more ice water in small increments, until the dough holds together well enough to form a ball.
- Chill the dough: Transfer the dough to a sheet of plastic wrap. Using your hands, flatten it into a circle about 8-inches in diameter, wrap tightly, and refrigerate for 1 hour. (At this point the dough can be frozen for up to 6 weeks and thawed in the refrigerator before use.)
- Prepare the pear filling: While the crust is chilling, combine the sliced pears, cinnamon, lemon juice, and salt in a large bowl. Toss gently until the pear slices are coated with the cinnamon. Cover and set aside.
- Roll the dough: Preheat the oven. Cut two pieces of parchment paper large enough to line a rimmed baking sheet and dust one of them lightly with flour. Place the chilled dough on top, dust that with flour as well, and place the other piece of parchment on top. Gently roll the dough from the center out, to a diameter of 12 to 13 inches, dusting with a little additional flour to prevent sticking as you go. Carefully remove the top sheet of parchment and slide the bottom one onto the baking sheet.
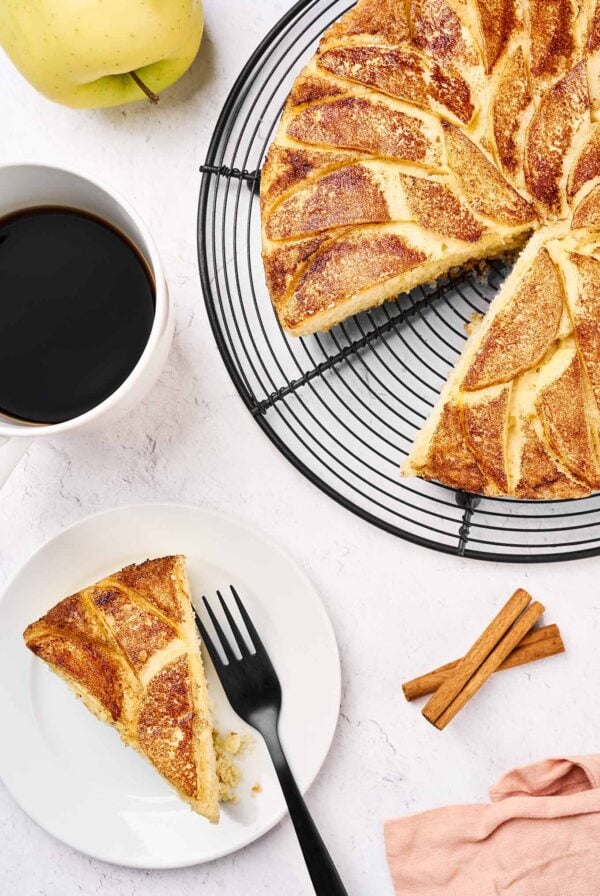
- Assemble the galette: Starting in the center, arrange the pear slices in a casual spiral pattern several layers thick, making sure to leave a 2-inch border all around. Gently fold the crust over the filling, pleating it loosely. Whisk the egg and water together in a small bowl to make a wash, then brush over the edges of the galette and sprinkle with sugar.
- Bake and serve: Loosely tent the top of the galette with foil. This will prevent the edges from getting too brown and help to tenderize the pears. Bake for 25 minutes, then remove the foil, rotate the baking sheet, and continue baking for an additional 20 to 25 minutes, or until the crust is crisp and golden and the pears are tender. Transfer to a rack and cool before cutting into wedges. Top with fresh whipped cream or ice cream if desired.

How to Make This Recipe Your Own
Galette fillings are really versatile, so why not put your own spin on this easy dessert? Here are a few ideas:
- Apples: You can substitute apples (we recommend a combination of Golden Delicious and Granny Smith) for the pears, or use a combination of apples and pears together.
- Spices: Allspice, ground ginger, ground cardamom (or, use pumpkin pie spice).
- Nuts: Chopped pecans, almonds, or walnuts
- Dried fruit: Toss in a handful of golden raisins, some chopped dried apricots, or chopped dried cherries.
- Liquor: Replace one teaspoon of the lemon juice with bourbon or rum.
Did you come up with something different? Leave a comment and let us know what you made.

Easy Pear Galette
Ingredients
- 4 pears, peeled, cored and sliced
- 1 teaspoon ground cinnamon
- 1 tablespoon lemon juice
- Pinch of salt
- 1 egg, lightly beaten
- 1 tablespoon water
- Sugar for sprinkling
For the crust:
- 8 tablespoons unsalted butter, well-chilled
- 1-1/4 cups all-purpose flour
- 1 tablespoon sugar
- 1/4 teaspoon salt
- 3 to 5 tablespoons ice water
Instructions
- Have a glass of ice water standing by and cut the butter into 16 pieces.
To mix the dough in a food processor:
- Place the steel blade into the work bowl of your food processor and add the flour, sugar, and salt.
- Scatter the butter over the flour. Using the pulse function, process until the mixture is coarse and crumbly, with visible pieces the size of very small peas.
- Sprinkle the mixture with 3 tablespoons of ice water and pulse until the dough comes together, adding water in teaspoon increments as needed. Be careful not to over-process.
To mix the dough by hand:
- Whisk the flour, sugar, and salt together in a large mixing bowl and add the butter pieces.
- Using your fingertips (or a pastry cutter), work the butter into the flour mixture until it's coarse and crumbly with visible pieces the size of very small peas.
- Make a well in the center and add 3 tablespoons of ice water. Mix with your fingertips, adding ice water by the teaspoonful, until the dough holds together well enough to form a ball.
Chill the dough:
- Transfer the dough to a sheet of plastic wrap. Using your hands, flatten it into a circle about 8-inches in diameter, wrap tightly, and refrigerate for 1 hour. (At this point the dough can be frozen for up to 6 weeks and thawed in the refrigerator before use.)
Prepare the pear filling:
- While the crust is chilling, combine the sliced pears, cinnamon, lemon juice and salt in a large bowl. Toss gently until the pear slices are coated with the cinnamon. Cover and set aside.
Roll the dough:
- Position a rack in the center of the oven and preheat to 400°F.
- Cut two pieces of parchment paper large enough to line a rimmed baking sheet and dust one of them lightly with flour. Place the chilled dough on top, dust that with flour as well, and place the other piece of parchment on top.
- Gently roll the dough from the center out, to a diameter of 12 to 13 inches, dusting with a little additional flour to prevent sticking as you go. Carefully remove the top sheet of parchment and slide the bottom one onto the baking sheet.
Assemble the galette:
- Starting in the center, arrange the pear slices in a casual spiral pattern several layers thick, making sure to leave a 2-inch border all around. Gently fold the crust over the filling, pleating it loosely.
- Whisk the egg and water together in a small bowl to make a wash, then brush over the edges of the galette and sprinkle with sugar.
Bake and serve:
- Loosely tent the top of the galette with foil. This will prevent the edges from getting too brown and help to tenderize the pears. Bake for 25 minutes, then remove the foil, rotate the baking sheet, and continue baking for an additional 20 to 25 minutes, or until the crust is crisp and golden and the pears are tender.
- Transfer to a rack and cool for about 20 minutes before cutting into wedges. Top with fresh whipped cream or ice cream if desired.
Notes
- Apples: You can substitute apples (we recommend a combination of Golden Delicious and Granny Smith) for the pears, or use a combination of apples and pears together.
- Spices: Allspice, ground ginger, ground cardamom (or, use pumpkin pie spice).
- Nuts: Chopped pecans, almonds, or walnuts
- Dried fruit: Toss in a handful of golden raisins, some chopped dried apricots, or chopped dried cherries.
- Liquor: Replace one teaspoon of the lemon juice with bourbon or rum.
Nutrition
Nutrition information is automatically calculated, so should only be used as an approximation.


Amazing and so easy to make!
Thank you Danielle! We are so glad to hear you enjoyed it.
I’ve always relied on pre-made pie crusts because I’ve failed miserably making them from scratch. This recipe was a game changer!!!
I made the pie crust the day before, so it chilled overnight in the fridge.
The filling prep was super simple. The crust rolled out beautifully between the two layers of parchment. I feared another fail because the butter was not fully incorporated.
I assembled the gallette and used raw sugar crystals on the egg wash.
The result was amazing!! The pears were very good, but the flaky sugary crust put it over the top! I am so glad I made this now, so it will also be a Thanksgiving dessert! Thank you!!!
Hi Cindy,
I’m thrilled to hear that you liked the recipe – particularly the galette crust. Since moving to Florida from New England, I’ve had my own struggles with homemade pie crust (don’t really understand why), but this crust seems foolproof. Thanks so much for taking time to leave a comment and rating.
I’m going to try this, can you freeze the finished galette for another time?
Hi Sharon,
I have not frozen this myself, but I’ve frozen apple pie successfully and I think the galette is similar enough. Let leftover galette cool completely, wrap first in plastic wrap, then aluminum foil. When you want to serve it, defrost completely at room temperature and reheat in the oven to crisp the crust – 350°F for 10 to 12 minutes. It should keep for 4 to 6 weeks in the freezer. Hope this helps.
Simple and satisfying! I also tried it with a little corn starch in the filling and a plum glaze on the pears after baking.
Hi Ken,
So glad you like the pear galette. Cornstarch is a good idea if you think your pears might give off a little liquid as they bake. The plum glaze sounds like a delicious addition. Did you buy it or was it homemade?