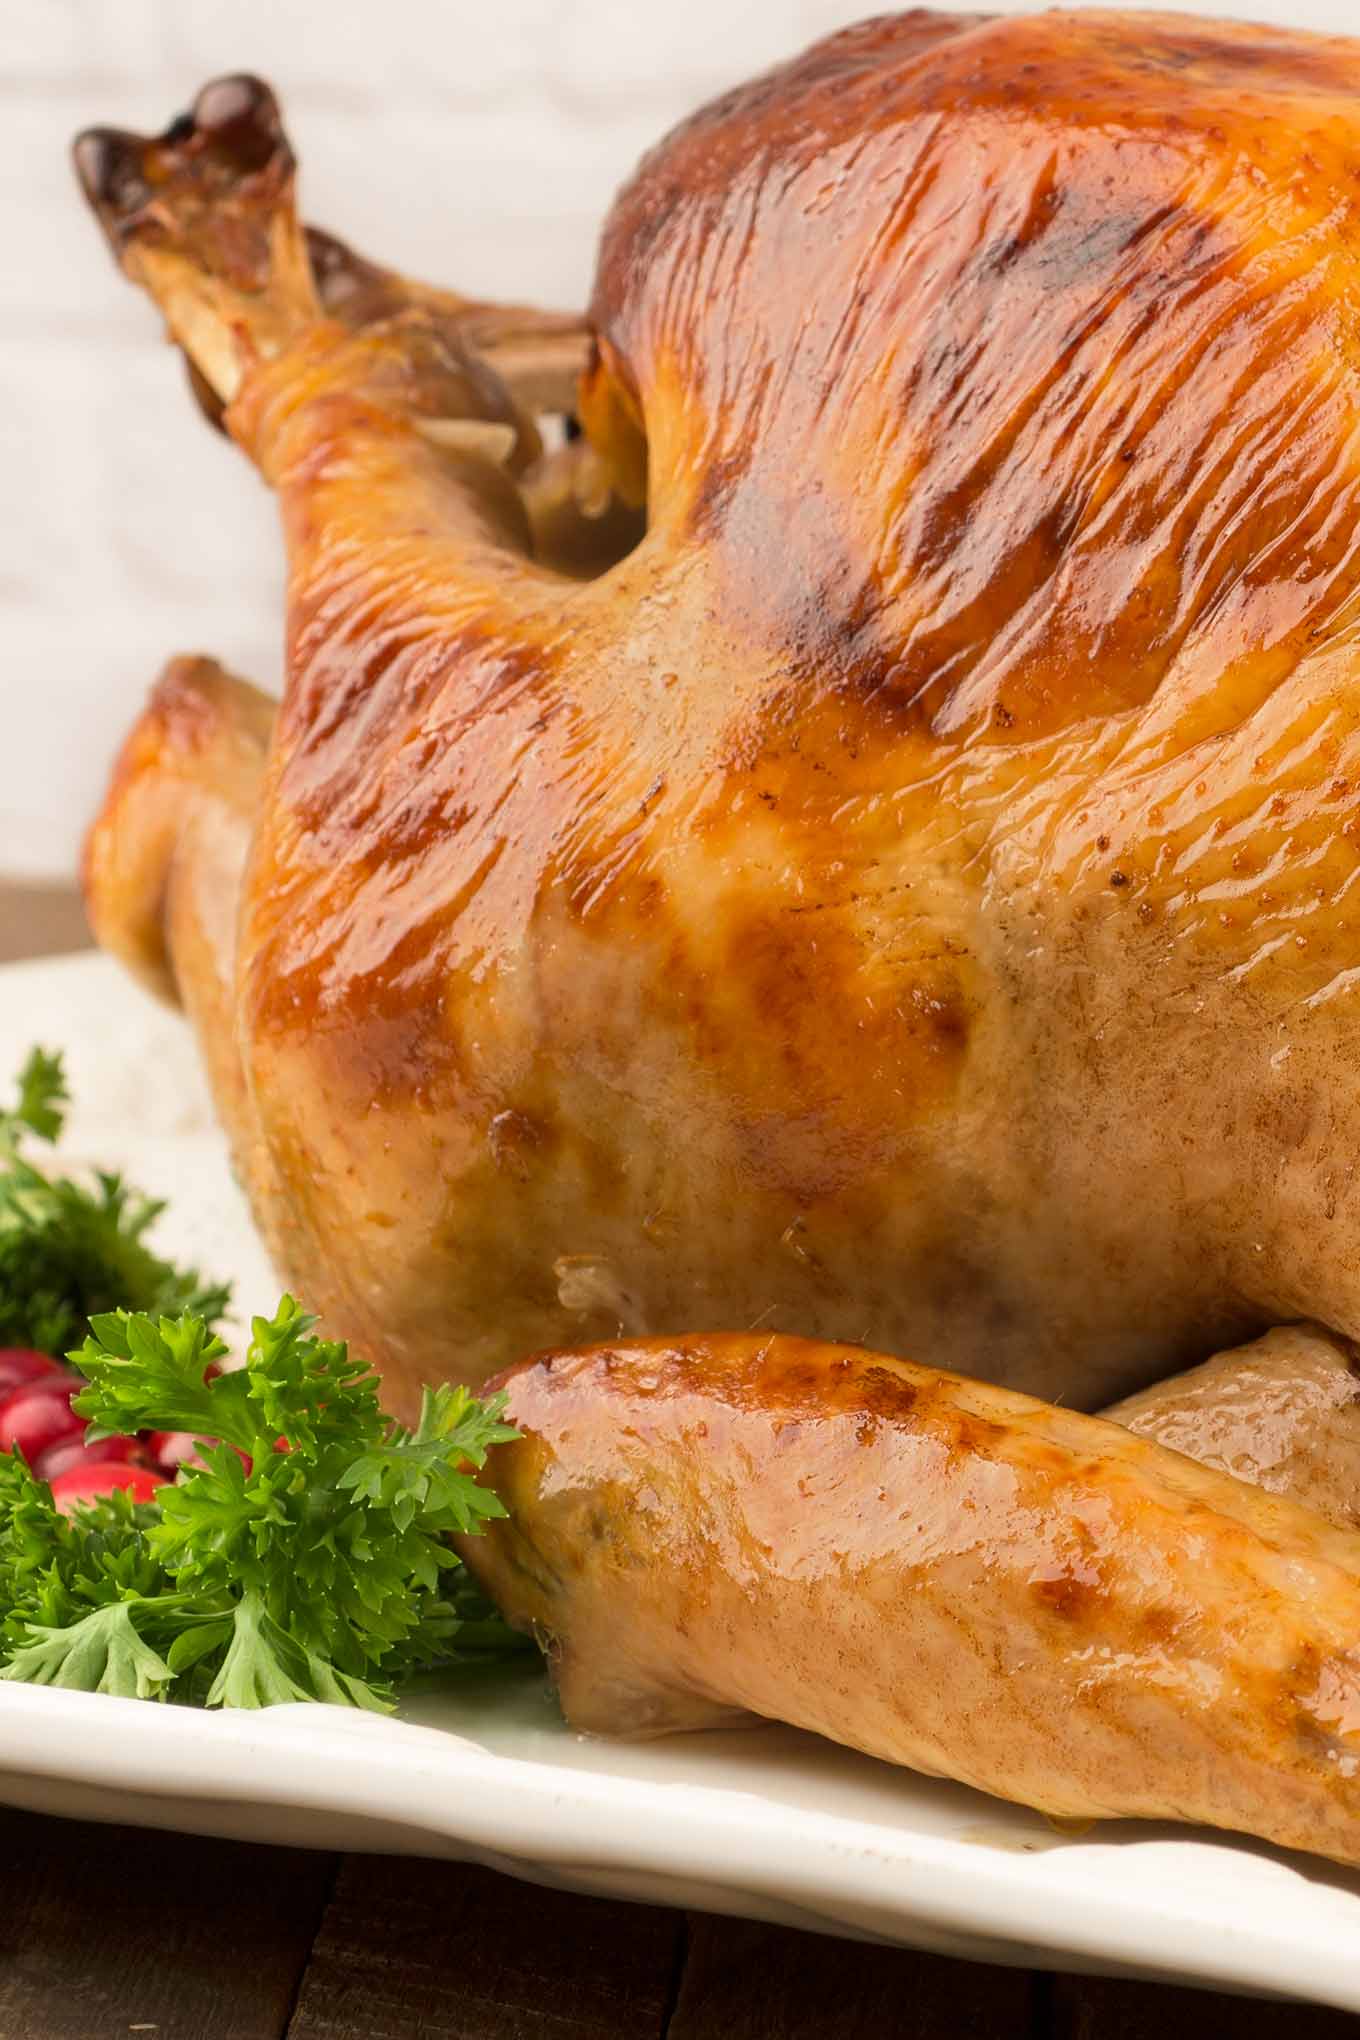
Juicy, tender, and flavorful roasted turkey is easy to make with our detailed, step-by-step recipe. Try our brining method for guaranteed delicious results.
A whole roasted turkey on a rack in a roasting pan with juices for making gravy.

Preparing the perfect roast turkey can feel overwhelming, but with the right guidance, it’s easier than you think. This step-by-step guide covers everything you need to know, from how to select the right turkey for your needs, brine it for maximum tenderness and flavor, butter-baste it to golden perfection, and create a delicious pan gravy to go with it. With tips on defrosting, carving, and storing leftovers, you’ll have all the tools to make your roast turkey dinner a success.

Notes From the MGC Kitchen

Over the years, we’ve experimented with different methods of cooking whole, roasted turkey and have settled on a few that give consistently good results. This recipe, made with a wet brine, is a reliable way to make an outstanding traditional turkey. The brining process yields tasty, tender, juicy turkey every time and is worth the extra trouble. But the brine is optional, so if you don’t want to do that, you can just follow the butter-basting and roasting instructions. You’ll still end up with great results.

Key Ingredients

This is an overview of the key ingredients for this recipe. Please see the printable recipe card below for the complete listing, including quantities.

  • TURKEY: When shopping for a turkey to brine, it’s important to read the label carefully and choose one that hasn’t already been injected with a salt solution (see our turkey shopping FAQs below). If you have an injected turkey and would still like to brine it, try our buttermilk and honey-brined turkey recipe.
  • AROMATICS: We insert chunks of apple, onion, celery, and garlic into the turkey’s cavity before roasting. This infuses the meat and the pan drippings with added flavor.
  • FRESH HERBS: Sprigs of fresh rosemary, thyme, and sage go into the cavity along with the aromatics. We recommend sticking with fresh herbs here.
  • BUTTER: Butter is spread under the skin of the breast and over the legs to add flavor and moisture and help with even browning. We recommend using unsalted butter since the turkey is brined.
  • CHICKEN BROTH: Chicken broth in the roasting pan keeps the pan juices from burning and serves as a base for gravy. You’ll definitely want to use the low-sodium version.

For the brine (optional):

  • SPICES: The brine is flavored with whole cloves, allspice berries, cinnamon sticks, and bay leaf for added flavor.
  • SALT AND SUGAR: Kosher salt is a must for brines, and since the brands vary somewhat in their sodium content by volume, we recommend buying Morton kosher salt for this recipe. White granulated sugar is fine to use.

How To Brine A Turkey

This is an overview of the turkey brining process. Please see the printable recipe card below for more detailed instructions.

Brining a turkey involves soaking it in a mixture of water, salt, sugar, herbs, and spices for several hours or overnight to enhance the flavor, texture, and juiciness of the meat. The salt in the brine helps the meat retain moisture and absorbs additional flavorings, resulting in a more tender and flavorful turkey when cooked.

A fresh, raw turkey on a white background.

PREPARE THE BRINE: To make the brine, add whole cloves, allspice, cinnamon sticks, and bay leaves to a large saucepan. Add 2 quarts of water and bring to a simmer over medium heat. Reduce the heat to medium-low, cover, and cook for 30 minutes. Remove the spices with a slotted spoon, then stir in the salt and sugar until completely dissolved. Remove from the heat and stir in another quart of cold water to speed cooling. Add the mixture to a food-safe 5-gallon plastic tub. Pour in an additional 5 quarts of ice water. The water must be very cold (40°F) before you add the turkey.

ADD THE TURKEY TO THE BRINE: Remove the neck, giblets, liver, etc. from the turkey and reserve them for gravy or stock. Drain off any liquid that has accumulated in the cavity of the turkey and add the bird to the cold brine.
Be sure the turkey is fully submerged, and the cavity has filled with liquid. Cover and refrigerate for 8 hours or overnight. Note: If you feel the turkey is unevenly submerged, turn it once about midway through the brining time.

IMPORTANT: For safety, you should always keep your turkey refrigerated at 40°F or below during brining.

Want to brine a turkey breast? Give our apple cider turkey brine a try!

An overhead view of a whole, brined and roasted turkey in its roasting pan, nicely browned and ready to be carved.

How To Roast A Turkey

This is an overview of the turkey roasting process. Please see the printable recipe card below for more detailed instructions.

RINSE THE TURKEY: Thoroughly coat a roasting pan fitted with a rack with nonstick spray. Remove the turkey from the brine, rinse it inside and out under cool running water, then pat dry thoroughly with paper towels. If you didn’t brine your turkey, season the cavity with salt and pepper.

ADD THE AROMATICS: Add the apple chunks, onion, celery, garlic, sage, thyme, and rosemary to the turkey’s cavity. Tuck the wings behind and under the back of the bird and tie the drumstick ends together with kitchen twine. Place the turkey on the roasting rack breast side up and set aside, uncovered, for 1 hour to reduce the refrigerator chill.

COAT THE TURKEY WITH BUTTER: After 1 hour, preheat the oven to 425°F. Carefully work your fingers under the skin of the turkey breast to loosen it from the meat. Spread some of the softened butter under the skin, massaging afterward to distribute the butter as evenly as possible. Take the remaining butter and rub it all over the outside of the bird being sure to coat the thighs and drumsticks. If you didn’t brine your turkey, season liberally with salt (we recommend kosher) and pepper.

BEGIN ROASTING (HIGH TEMP): Pour 3 cups of chicken broth into the roasting pan and place the turkey in the oven. Roast the turkey for 30 minutes at 425°F, then rotate the roasting pan in the oven and reduce the temperature to 325°F.

CONTINUE ROASTING (LOWER TEMP): Continue roasting, basting the turkey with the accumulating pan juices every 30 minutes. Roasting time for a whole turkey (unstuffed) is approximately 13 minutes per pound. This includes the 30 minutes at the higher temperature. Depending on size, you can expect to roast your 10 to 12-pound turkey for an additional 1-1/2 to 2 hours.

CHECK THE TEMPERATURE: To avoid overcooking, start checking the turkey’s internal temperature after 1-1/4 to 1-1/2 hours of total cooking time (see notes).
To properly check the temperature, insert an instant-read thermometer into the thick, interior section of the thigh, away from the bone. Turkey is done when that temperature registers 165°F.
LET THE TURKEY REST BEFORE CARVING: Remove the turkey from the oven, and let it rest for 30 minutes to help keep the juices from running out before carving.

How to Make Pan Gravy

USE THE PAN JUICES: While the turkey rests, skim any excess fat from the pan juices and transfer them to a 4-cup measure. Add enough extra chicken broth to equal 3 cups of liquid total.

MAKE THE GRAVY: Pour the juices and broth into a saucepan and bring it to a simmer over medium heat. In a small bowl, whisk together cornstarch and water to make a slurry. Add it to the simmering broth and continue whisking just until thickened and smooth. Season to taste with salt and freshly ground black pepper. Transfer to a bowl or gravy boat for serving.

Tips for Success

STORING A TURKEY: A whole turkey is a big piece of meat that takes up a fair amount of refrigerator real estate and it’s important to handle it safely. Turkey should be kept refrigerated at 40°F or below until 1 to 1-1/2 hours prior to roasting.

DEFROSTING A TURKEY: Frozen turkeys should be defrosted in the refrigerator, never on the counter. Allow 24 hours for every 5 pounds in weight and be sure to round the weight up when calculating this time. For example, a 12-pound turkey will take three days to defrost in the fridge.

SPEEDING UP DEFROSTING: If your turkey doesn’t defrost in time, here’s how to speed up the process:

  • Leaving the turkey in its original wrapper, place it in a large container like a cooler or food-safe bucket and cover it completely with cold tap water. You may need to weigh it down with something heavy to keep it submerged.
  • Change the water every 30 minutes until the turkey is defrosted.
  • Rule of thumb is to allow 30 minutes per pound for the cold-water defrosting method. For example, a 12-pound turkey will take 6 hours to defrost from fully frozen.
  • Once the turkey is defrosted, prepare it for roasting immediately.

HOW TO GET A CRISPY SKIN: If you want crispy skin on your turkey, remove it from its wrapper (or if you’ve brined it, remove it from the brine and pat it dry), and let it sit uncovered in the refrigerator for a minimum of 6 hours before roasting.

CARVING TIPS: Plan to carve your turkey in the kitchen, not at the table. Make sure you have a good, sharp knife and a cutting board large enough to accommodate your turkey, preferably one with a channel all around to catch any juices that run. For step-by-step instructions on how to carve a turkey, we recommend watching the Culinary Institute of America’s How to Carve a Turkey video. Their method is the best and the easiest.

A side view of a golden brown, roasted turkey in the pan.

Storing and Reheating Leftover Turkey

For safety, be sure to refrigerate all leftovers within 2 hours of removing the turkey from the oven. Store tightly wrapped for up to four days in the refrigerator or for six weeks in the freezer.

Tips for Reheating:

Here’s our favorite method for reheating leftover turkey and keeping it moist:

  • Pour about 1/2-inch of turkey or chicken broth into a frying pan and heat it to a gentle simmer.
  • Add slices of turkey in a single layer and warm for 30 to 45 seconds per side before plating individual servings.

Frequently Asked Questions About Shopping For A Turkey

Here are some common questions about buying a whole turkey:

How much turkey should I buy?

A basic rule of thumb is to plan on 1-1/4 lbs per person. For example, a 12 to 13-pound bird should feed 10 people nicely and leave you with some leftovers for sandwiches.

Which is better, frozen or fresh turkey?

When cooked properly, the difference between fresh and frozen turkey is minimal, but a fresh bird is generally a bit juicier. You’d probably need to be tasting them side by side to notice that though, so if you want to buy a frozen turkey, don’t ever worry that you’re making a compromise.

What is a self-basting turkey?

Self-basting turkeys have been injected with a brining solution made with broth, seasonings, and salt. They are meant to be as easy as possible to prepare, so don’t plan on using a brine on one of these birds as you could end up with some unpleasantly salty results. The same rule applies to kosher turkeys. Kosher turkeys are pre-salted as part of the koshering process, so you don’t want to brine a kosher turkey, either.

What is an all-natural turkey?

A turkey that is labeled “all-natural” won’t include any preservatives or artificial flavorings, but like self-basting turkeys, they may also be injected with a brining solution. To be sure you know what you’re getting, read the label carefully, as the meaning of this term is not always consistent.

What’s the difference between pasture-raised, free-range, and organic turkey?

Pasture-raised and free-range turkeys can roam outdoors and are fed a varied diet. They’re treated more humanely, which can result in improved flavor. Organic turkey farming goes a step further. These birds eat only organically grown feed, aren’t treated with antibiotics, and are often pasture-raised or free-range in addition.

What is a heritage turkey?

A heritage turkey is a bird that is descended from one of a few special breeds and must meet specific criteria. They are generally smaller than commercially bred birds and have a stronger flavor, less breast meat, and more muscular thighs. If you plan to buy one, find a producer and reserve your bird early because they are quite popular and usually sell out completely well before the major holidays.

Want to save this recipe?
Enter your email. We’ll send a handy link straight to your inbox and add you to our mailing list.
A whole roasted turkey on a rack in a roasting pan with juices for making gravy.
5 from 1 vote

Juicy Roast Turkey, Brined and Butter Basted

Juicy, tender, and flavorful roasted turkey is easy to make with our detailed, step-by-step recipe. Try our brining method for guaranteed delicious results.
Prep: 1 hour
Cook: 2 hours 45 minutes
Brining time: 8 hours
Total: 11 hours 45 minutes
Servings: 10 servings

Ingredients

  • 10 to 12 pound minimally processed fresh turkey, see notes below
  • 1 large Granny Smith apple, peeled and cut into chunks
  • 1 small onion, peeled and quartered
  • 1 stalk celery including leafy top, roughly chopped
  • 4 cloves garlic, peeled and left whole
  • 1 sprig fresh sage
  • 2 sprigs fresh thyme
  • 1 sprig fresh rosemary
  • 5 tablespoons butter, softened
  • 4 to 6 cups chicken broth, divided
  • 1/4 cup cornstarch

For the brine:

  • 10 whole cloves
  • 10 whole allspice berries
  • 2 cinnamon sticks
  • 3 bay leaves
  • 1 cup kosher salt
  • 1 cup sugar
  • 2 gallons water, divided
Save This Recipe
Enter your email. We’ll send a link to this recipe and subscribe you to our list.

Instructions 

Brining the turkey:

  • Prepare the brine by adding the cloves, allspice, cinnamon, and bay leaves to a large saucepan. Add 2 quarts of water and bring to a simmer over medium heat.
  • Reduce the heat to medium-low, cover, and cook for 30 minutes. Remove the spices with a slotted spoon, then stir in the salt and sugar until completely dissolved. Remove from the heat and stir in another quart of cold water to speed cooling.
  • Add the mixture to a food-safe 5-gallon plastic tub. Pour in an additional 5 quarts of ice water. The water must be very cold (40°F) before you add the turkey.
  • Remove the neck, giblets, liver, etc. from the turkey and reserve them for gravy or stock. Drain off any liquid that has accumulated in the cavity of the turkey and add the bird to the cold brine.
  • Be sure the turkey is fully submerged, and the cavity has filled with liquid. Cover and refrigerate for 6 to 8 hours.
    Note: If you feel the turkey is unevenly submerged, turn it once about midway through the brining time.

Rinse the turkey:

  • Thoroughly coat a roasting pan fitted with a rack with nonstick spray. Remove the turkey from the brine, rinse it inside and out under cool running water, then pat dry thoroughly with paper towels.
  • IF YOU DID NOT BRINE YOUR TURKEY: Season the cavity with salt and pepper before proceeding to the next step.

Add the aromatics:

  • Add the apple chunks, onion, celery, garlic, sage, thyme, and rosemary to the turkey's cavity. Tuck the wings behind and under the back of the bird and tie the drumstick ends together with kitchen twine.
  • Place the turkey on the roasting rack breast side up and set aside, uncovered, for 1 hour to reduce the refrigerator chill.

Coat the turkey with butter:

  • After 1 hour, preheat the oven to 425°F (400°F convection – see notes).
  • Carefully work your fingers under the skin of the turkey breast to loosen it from the meat. Spread 2 tablespoons of the softened butter under the skin, massaging afterward to distribute the butter as evenly as possible. Take the remaining butter and rub it all over the outside of the bird being sure to coat the thighs and drumsticks.
  • IF YOU DID NOT BRINE YOUR TURKEY: After spreading the butter over the outside of the bird, season liberally with salt (we recommend kosher) and pepper.

Begin roasting (high temp):

  • Pour 3 cups of chicken broth into the roasting pan and place the turkey in the oven. Roast the turkey for 30 minutes at 425°F, then rotate the roasting pan in the oven and reduce the temperature to 325°F.

Continue roasting (lower temp):

  • Continue roasting, basting the turkey with the accumulating pan juices every 30 minutes.
  • Roasting time for a whole turkey (unstuffed) is approximately 13 minutes per pound. This includes the 30 minutes at the higher temperature. Depending on size, you can expect to roast your 10 to 12-pound turkey for an additional 1-1/2 to 2-1/4 hours (see notes).

Check the temperature:

  • To avoid overcooking, start checking the turkey's internal temperature after 1-1/2 hours of total cooking time (see notes).
  • To properly check the temperature, insert an instant-read thermometer into the thick, interior section of the thigh, away from the bone. Turkey is done when that temperature registers 165°F.

Let the turkey rest:

  • Remove the turkey from the oven, and let it rest for 30 minutes to help keep the juices from running out before carving.

Make the pan gravy:

  • While the turkey rests, skim any excess fat from the pan juices and transfer them to a 4-cup measure. Add enough extra chicken broth to equal 3 cups of liquid total.
  • Pour the broth into a saucepan and bring it to a simmer over medium heat. In a small bowl, whisk together the cornstarch with 1/3 cup water to make a slurry. Add it to the simmering broth and continue whisking just until thickened and smooth. Season to taste with salt and freshly ground black pepper. Transfer to a bowl or gravy boat for serving.

Notes

About the Roasting Time

The total roasting time needed for a whole turkey can vary. Much depends on the temperature of the turkey when it goes into the oven, how much heat is lost when opening the oven door for basting, and the accuracy of the oven itself. Use both your good judgment and a reliable meat thermometer.

Convection Oven Notes

If you have the option to shut off the convection feature, we recommend doing so as that hot circulating air can can throw off cooking times and potentially dry out the turkey. If you can’t roast without the convection fan, start the turkey at 400°F instead of 425°F, reduce the temperature to 325°F after 30 minutes as written in the recipe, but begin checking the internal temperature after 1-1/4 hours. The convection can reduce the roasting time by up to 25%. Consult your oven’s manual for best practices.

Tips for Success

HOW TO GET CRISPY SKIN: If you want crispy skin on your turkey, remove it from its wrapper (or if you’ve brined it, remove it from the brine and pat it dry), and let it sit uncovered in the refrigerator for a minimum of 6 hours before roasting.
CARVING TIPS: Plan to carve your turkey in the kitchen, not at the table. Make sure you have a good, sharp knife and a cutting board large enough to accommodate your turkey, preferably one with a channel all around to catch any juices that run. For step-by-step instructions on how to carve a turkey, we recommend watching the Culinary Institute of America’s How to Carve a Turkey video. Their method is the best and the easiest.
FOOD SAFETY: Be sure to refrigerate all leftovers within 2 hours of removing the turkey from the oven. Store tightly wrapped for up to four days in the refrigerator or for six weeks in the freezer.

Nutrition

Calories: 357kcal, Carbohydrates: 4g, Protein: 58g, Fat: 11g, Saturated Fat: 5g, Polyunsaturated Fat: 1g, Monounsaturated Fat: 3g, Cholesterol: 182mg, Sodium: 1066mg, Potassium: 669mg

Nutrition information is automatically calculated, so should only be used as an approximation.

Like this recipe? Rate and comment below!

Share with friends:


You May Also Like

Lynne Webb and Erika Pitera, creators of MyGourmetConnection in the kitchen, working on a soup recipe for the website.

About Us

We’re Lynne and Erika, a mother-daughter duo passionate about creating recipes that bring flavor and variety to your kitchen in a simple, approachable way.

5 from 1 vote

Leave a comment

Your email address will not be published. Required fields are marked *

Recipe Rating


8 Comments

  1. This recipe was the first brined turkey I ever tried and I was really happy with the way it turned out, Brining requires a little bit of extra thought and planning, but I think I’ll be doing this for my Thanksgiving turkeys from now on.5 stars

  2. I have been brining chicken for barbecue for several years. Now I am going to bring my Thanksgiving turkey. Keeping my fingers crossed.

  3. we want to my mother’s house for Thanksgiving, so the day after, we bought our own turkey which i will be cooking tomorrow so we can have our own leftovers and i was just looking for a recipe! this sounds good. i heard brining was really good for the turkey but I have never tried it. i think i will this time! more flavor!

  4. I have thought about brining my turkey, but have yet to try it. I have traditionally roasted and fried turkeys.